

Hi this is my first BMW motorcycle so I am really in the dark on this one!..... I purchased the bike about two weeks ago but I cannot get it running. This is what I have so far...
Turn the key, headlight on. I cant switch high beam low beam. Gauges illuminated, rear signals & tail light illuminated. No front signals. Turn signal switch does not function, kill switch does not seem to function along with the starter switch.
All wiring seems to be attached properly as far as I can tell. All the colored wires are match to the board. I just cant tell if anything is missing. There is one black wire that is not attached to anything and I cant tell where it goes from the diagram. Also I have a "tung flasher" that is loose inside the headlight assembly , no idea what this does or where it goes. Any help would be much appreciated!
That looks like an aftermarket flasher, the stock position is inside the headlamp bucket on the right side. Stock ones cost about $100.00.
First thing on your wiring, are you getting 12v on the red wire going to ignition switch. the path is from battery to starter relay to diode board to switch.
Checking and cleaning grounds may really help as that causes many issues. There is a big bundle under the tank with a bunch of brown wires all tied
together, unhook the bundle, clean the lugs and make sure the frame is clean to bare metal. I like to put a star washer under the bundle so the teeth dig into the frame metal. See if you are getting 12v to the + side of coil, green wire, comes from panel inside headlight, which is fused.

It's as Jagarra said.
• Use a lighted test lamp/probe connected to an engine fin. Follow the power from the battery Positive, to the starter, to the rear of the ignition switch on RED. That wire is "hot" all the time. Power goes into the ignition switch and comes out on GRN. You should see that happen when turning the key. Unplug GRN from the ignition coil. Do you have power on GRN ?
• A well thought out and organized test sequence is much more productive than jumping around from place to place. Use a schematic to follow the current flow. If you don't have a schematic, then get one from Goggle images.
• Ignition switches are a known trouble spot and most are no longer available as new. They can be rebuilt, if you are careful.
• GRN goes into the headlamp shell to a 8A fuse and comes out GRN/BLK. These older German fuses are really bad to loose contact. Spin them in their contact seats to reestablish connection.
• Test for ignition results by removing the plugs from the head and laying them on top of the cyl head plugged into the wires. I would highly suggest 2 brand new plugs, since stale fuel will foul the plugs in an instant. (You did replace ALL the fuel in the tank and carbs with brand new fuel, didn't you ???)
• Points corrode. Use some 280 or higher grit to clean the points.
• I had similar issues on my 1979 which had been in storage 3 years. These bikes have had 40 years of rain and spray washing. Terminals corrode and reduce or completely inhibit electrical current flow. Each connector, fuse, terminal, battery post, etc you pull off should be re-installed with a electrical connection corrosion inhibitor, such as No-Ox by Sanchem. Each connection just needs a dab. You can get a tiny tube on Amazon, which is enough to repair 10 motorcycles.
Good luck.
Owning an old Airhead is easy.
Keeping an old Airhead running great is the true test.
An investment I have made for my BMWs is a big colored schematic. These are 11x17" colored and laminated well worth the price.
http://colorwiringdiagrams.com/products/bmw-r606-r756-r906-1975-1976
Thank you for the response. I have a wiring diagram but I think there has been some "modifications" to the original layout. As mentioned I did just purchase the bike and it had a vetter fairing installed on it. When I purchased the bike the previous owner jump started it and it ran fine. I brought it home and replaced the battery and removed the fairing. I uninstalled the harness from the vetter , and now I have the no start situation.
The strange thing is when I pulled the fairing off there is one black wire with a female end on it that was just sitting loose. I cant find this location anywhere on the wiring diagram. I can upload better pictures if that would be helpful.
The black wire comes from the horn button and goes to the circuit board in the head light, the other side which is also black goes to the horn.
i still would advise you to get a model/year specific schematic. I am working off mine which is for a 1974 model.
Since you were messing with the headlight putting it back to stock I would go back in the area of the circuit board and see if anything was knocked loose.
It's been 40 years since I installed my last Vetter, but as I remember only the headlamp wiring is extended. None of the other stock wiring is altered. So really, the machine should at least show "fire" at the plugs.
So I take it you've installed a new battery. And have installed it with the Negative terminal going to the gearbox case for "ground".
Do you know if you have points or a third party electronic ignition (EI) ? It was very popular to install EI during the 80's and 90's. Being transistor based, EI is very sensitive to inadvertent shorts and other errors while messing with the wiring.
Owning an old Airhead is easy.
Keeping an old Airhead running great is the true test.
An investment I have made for my BMWs is a big colored schematic. These are 11x17" colored and laminated well worth the price.
colorwiringdiagrams.com/products/bmw-r606-r756-r906-1975-1976
now that you spent the $ to get this wiring diagram some are available off google.
i'd also take every diagram from every shop manual you have to a print shop and have 11x17'' Color Copies made. make several of each. put them in your shop binder!
if you don't have a good VOM that is a good investment. if you don't know how to use a VOM there are many on you-tube on how to's.
a simple test lamp is also handy.
http://www.ebay.com/itm/like/263140076364?chn=ps&dispItem=1
smaller ones are great to pack on the bike.
that first photo has a black covering which is stock bmw type. try and follow that wire back to it's source. using a VOM to check continuity will have you find the other end. it is [imho ] a good idea to label wires. while you are at this looking around take note and or draw what you see and document the positions of the wires on the relays or switches. the circuit board isn't necessary because every color got to a specific spade. while you're at this take the time to LOOK at all connections and Clean them using a wire brush
these are pencil end or tube brushes that can get into smaller spaces.
https://www.mcmaster.com/#=199qk3h
https://www.mcmaster.com/#=199qkje
https://www.mcmaster.com/#wire-end-brushes/=199qkrt
https://www.mcmaster.com/#miniature-wire-hand-brushes/=199qp2v
See if you are getting 12v to the + side of coil, green wire, comes from panel inside headlight, which is fused.
i think in the 75 yr case it's a green/blue wire. after the switch is 'on' you should have 12vdc to the + coil
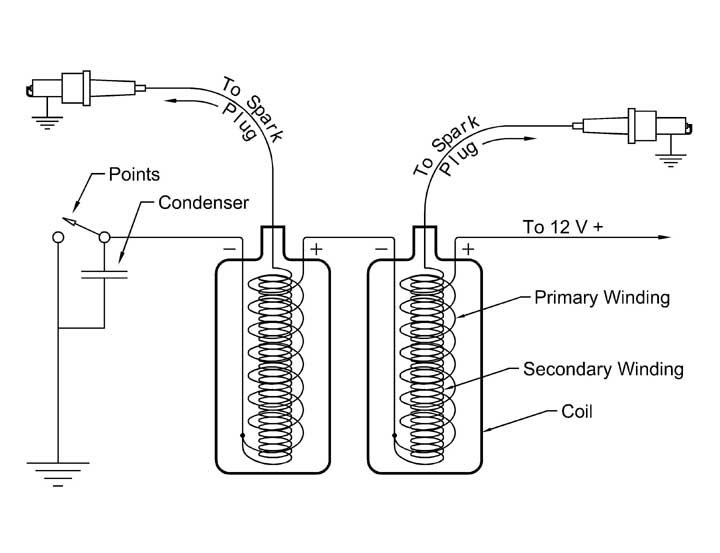
CORRECT COIL WIRING
So, I can get out an ohmmeter and check from the HV lead that plugs into
the spark coil to the tip of the electrode on the spark plug, and I should
see approximately 5K ohms, or maybe 6K ohms, total across everything?
The ohmmeter test that I like ( fast and simple ) is to read the resistance from one spark plug cap to the cap on the other side.
A good reading ( per CHITECH manual ) is
15,400 to 26,600 ohms on electronic ignition airheads.
5K plug caps.
test each plug wire by removing it and using a VOM test each one @ 5K.
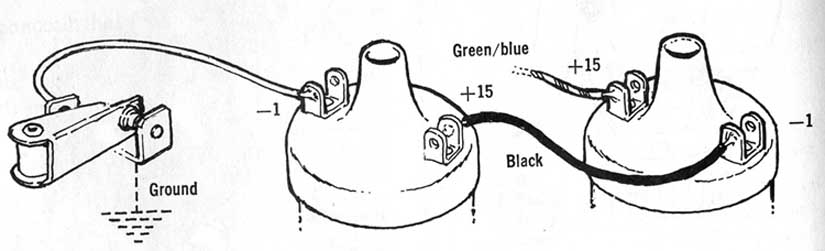
from key switched to #15 Left
#1 left to #15 right
#1 right to ignition
#1 = negative and #15 = positive
.
Turn the key, headlight on. I cant switch high beam low beam. Gauges illuminated, rear signals & tail light illuminated. No front signals. Turn signal switch does not function, kill switch does not seem to function along with the starter switch.
you have 3 or 4 key positions on your model.
so H/L turns on at the highest position 4
pilot bulb @ 3-4.
gauges illuminate and T/S work at pos. 2-4
tail lamp @ pos 3 and 4
brake lamp @ 2-3-4
T/S switch has 3 wires. in voltage 12vdc and left / right out
check you H/L circuit board and make sure you have front and rear colored wires in the correct spades.
kill switch opens the 12vdc path green - grn/blu to the coils if my memory works today.
Advertisement